View RSS Feed

KingNeptunesBounty

King Neptunes' 120 Gallon Sumpless Adventure.

Rating: 3 votes, 4.67 average.
So I'm most likely going to be bombarded with various post telling me that I am absolutely nuts for thinking about setting up an aquarium without a sump. But my wife purchased a standard 120 gallon All-Glass aquarium for me for Fathers Day and rather then take the aquarium back to the store to imply that she did something wrong I would rather run with it. Besides I know that a sump has many uses and provides for a broader spectrum of equipment to be used but in my thinking really what is a sump but an extension of your aquarium... And with the right mindset I'm pretty sure I can put together a thriving aquarium that will born born off the beaten path. Besides I personally like a challenge and definitely find myself not conforming to a standard in my everyday life. So thank you tagging along and let the adventure begin!


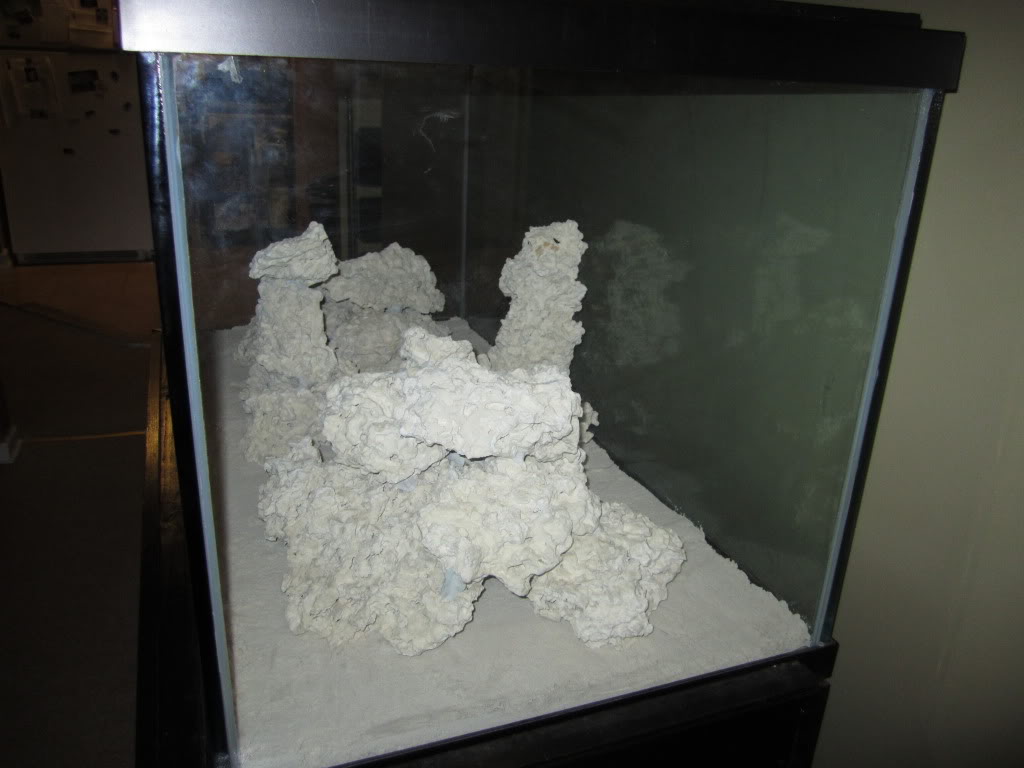
Aquascaping with Key Largo Rock and Bahamas Aragonite Sand
Thursday, July 01, 2010

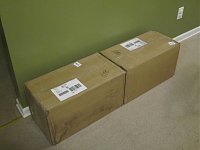
My goal with aquascaping within this aquarium was to keep it simple while providing enough swimming space for fish and enough room for coral growth. Granted it definitely makes things look a bit bare in the beginning, with rough estimates I have approximately the entire upper half of the aquarium free from rock work and I would say about 25 percent of the aquarium is free with caverns and caves for swimming space. Not to mention this should definitely make position of pumps for water flow extremely easy due to the lack of obstructions currently in the aquarium. So I turned to Marco Rocks for my order of 90 lbs. of Key Largo Rock from Florida and 40 lbs. of Bahamas Aragonite Sand. The 40 lbs. of
Bahamas Aragonite Sand gave me a 1 Inch sandbed which was perfect for my needs.

Click image for larger version

Name:	IMG_0263.jpg
Views:	122
Size:	145.0 KB
ID:	2148Click image for larger version

Name:	IMG_0261.jpg
Views:	110
Size:	156.6 KB
ID:	2155Click image for larger version

Name:	IMG_0271.jpg
Views:	131
Size:	81.1 KB
ID:	2156Click image for larger version

Name:	IMG_0269.jpg
Views:	124
Size:	97.0 KB
ID:	2157
Click image for larger version

Name:	IMG_0294.jpg
Views:	120
Size:	150.7 KB
ID:	2159 Click image for larger version

Name:	IMG_0311.jpg
Views:	110
Size:	182.6 KB
ID:	2146Click image for larger version

Name:	IMG_0309.jpg
Views:	421
Size:	114.2 KB
ID:	2145Click image for larger version

Name:	IMG_0317.jpg
Views:	403
Size:	96.6 KB
ID:	2143Click image for larger version

Name:	IMG_0318.jpg
Views:	409
Size:	93.3 KB
ID:	2144Click image for larger version

Name:	IMG_0319.jpg
Views:	393
Size:	86.5 KB
ID:	2142


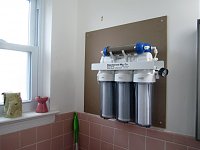
Tap Water Filtration with Water General 6 Stage Reverse Osmosis/Deionization System
Friday, July 02, 2010

I live in a wonderful area of the Bronx but like most reef aquarium enthusiast in New York and around the world for that matter, water quality straight from the tap is not something to be admired. So I decided to purchase a Water General 6 Stage Reverse Osmosis/Deionozation System to filter out the tap water for my aquarium. The unit was shipped from California and arrived about 1 week ago. I placed it in the half bathroom of our home in to appease my wife which would not let me place it underneath the counter in the kitchen which happen to be directly across from where the aquarium is sitting. Unfortunately the plumbing in the Half Bathroom is old school and the equipment included for setup with a compression based system would not work so I am waiting for a faucet adapter to be delivered to me to recitfy this issue. I would have changed the plumbing myself but it wasn't something I considered doing at this time. Also I have amazingly low water pressure and placed an order with H20 Science for an Aquatec 8800 Booter Pump with Transformer to resolve this issue along with an added bonus of a Dual In Line TDS Meter. The shipments should be delivered around Wednesday, July 07, 2010. Until then it looks pretty.


Water General 6 Stage Reverse Osmosis/Deionization System
  • Stage One: High Capacity 5 Micron Sediment Filter.
  • Stage Two: High Capacity Carbon Filter.
  • Stage Three: High Capacity Carbon Filter.
  • Stage Four: TFC 100 gallon per day Membrane.
  • Stage Five: Deionization & Demineralization Filter.
  • Stage Six: Deionization & Demineralization Filter.
Click image for larger version

Name:	WaterGeneralRODIWaterFiltrationSyst.jpg
Views:	102
Size:	194.6 KB
ID:	2149Click image for larger version

Name:	WaterGeneralRODIWaterFiltrationS-1.jpg
Views:	126
Size:	111.2 KB
ID:	2150Click image for larger version

Name:	WaterGeneralRODIWaterFiltrationS-2.jpg
Views:	116
Size:	201.2 KB
ID:	2151Click image for larger version

Name:	WaterGeneralRODIWaterFiltrationS-3.jpg
Views:	131
Size:	157.3 KB
ID:	2152Click image for larger version

Name:	WaterGeneralRODIWaterFiltrationS-4.jpg
Views:	133
Size:	152.3 KB
ID:	2153Click image for larger version

Name:	WaterGeneralRODIWaterFiltrationS-5.jpg
Views:	121
Size:	165.8 KB
ID:	2154

Tap Water Filtration with Faucet Diverter Valve
Friday, July 02, 2010

I came home to a great suprise today after work. The Faucet Divertor Valve that I had placed an order for just two days prior showed up earlier then expected. However, even after specifying that I required a 15/16 Male thread in order to connect it to my faucet I quickly realized they did not send me the appropriate adapter. So I went to two seperate Home Depot's in order to find the correct adapter only to discover that the particular size I needed was sold out in every store within 50 miles. So I managed to locate the piece from PlumbingSupply.com and placed my order. Hopefully it will be here before the end of next week.

Click image for larger version

Name:	IMG_0503.jpg
Views:	113
Size:	115.8 KB
ID:	2160Click image for larger version

Name:	IMG_0505.jpg
Views:	112
Size:	141.9 KB
ID:	2161


Tap Water Filtration with Aquatec 8800 Booster Pump & Hannah Instruments Dual TDS Meter
Wednesday, July 07, 2010

Well the UPS delivery guy showed up extremely late this evening to drop off my package. Poor guy looked exhausted and I really couldn't blame him because this heat has been horrible. But I got my delivery from H2O Science. I have to say I was not extremely impressed with their packing but at least my equipment made it here in one piece. I was a bit late but I still managed to mount the Aquatec 8800 Booster Pump next to my Water General 6-Stage Reverse Osmosis/Deionization System and mount and connect the Hannah Instruments Dual TDS Meter to the Water General 6-Stage Reverse Osmosis/Deionization System as well. I still have to clean up the tubing a bit using cable mounts but it was just too late to be hammering on the walls. Also I am still unable to test the system because I am still waiting on the Faucet Filter Adapter from PlumbingSupply.com. One feature I appreciate is that the Aquatec 8800 Booster Pump came with rubber feet to reduce the noise caused by the vibration of the unit.

Click image for larger version

Name:	IMG_0655.jpg
Views:	134
Size:	185.3 KB
ID:	2164Click image for larger version

Name:	IMG_0657.jpg
Views:	107
Size:	286.1 KB
ID:	2165Click image for larger version

Name:	IMG_0660.jpg
Views:	112
Size:	136.1 KB
ID:	2166Click image for larger version

Name:	IMG_0663.jpg
Views:	131
Size:	154.5 KB
ID:	2167Click image for larger version

Name:	IMG_0662.jpg
Views:	123
Size:	170.9 KB
ID:	2168
Click image for larger version

Name:	IMG_0665.jpg
Views:	116
Size:	124.0 KB
ID:	2169Click image for larger version

Name:	IMG_0664.jpg
Views:	119
Size:	164.9 KB
ID:	2170Click image for larger version

Name:	IMG_0666.jpg
Views:	142
Size:	168.5 KB
ID:	2171Click image for larger version

Name:	IMG_0668.jpg
Views:	106
Size:	177.0 KB
ID:	2172
Click image for larger version

Name:	IMG_0667.jpg
Views:	94
Size:	170.2 KB
ID:	2173Click image for larger version

Name:	IMG_0669.jpg
Views:	119
Size:	159.6 KB
ID:	2174Click image for larger version

Name:	IMG_0670.jpg
Views:	134
Size:	141.1 KB
ID:	2175Click image for larger version

Name:	IMG_0673.jpg
Views:	116
Size:	150.9 KB
ID:	2176


Tap Water Filtration with PlumbingSupply.com Faucet Adapter & H2O Science Diverter Valve
Saturday, July 10, 2010

I finally received the last piece of the puzzle yesterday. My PlumbingSupply.com 15/16 Male to 55/64 Male Faucet Adapter came in which allowed me to connect the H2O Science Diverter Valve to the sink in the Half Bathroom were I setup the Water General 6-Stage Reverse Osmosis/Deionization Tap Water Filtration System. Installation took about 5 minutes with all the necessary tubing being cut into the correct length. I also ran the Waste Water tubing adjacent to the Feed Water tubing in for direct exiting via the sink. I still have some slight cleaning up to do with the tubing and wireing so everything looks neat.

Click image for larger version

Name:	IMG_0692.jpg
Views:	125
Size:	156.9 KB
ID:	2198Click image for larger version

Name:	IMG_0695.jpg
Views:	123
Size:	193.3 KB
ID:	2199Click image for larger version

Name:	IMG_0696.jpg
Views:	114
Size:	163.9 KB
ID:	2200Click image for larger version

Name:	IMG_0697.jpg
Views:	125
Size:	188.4 KB
ID:	2201Click image for larger version

Name:	IMG_0698.jpg
Views:	119
Size:	212.9 KB
ID:	2202Click image for larger version

Name:	IMG_0699.jpg
Views:	115
Size:	196.1 KB
ID:	2203Click image for larger version

Name:	IMG_0700.jpg
Views:	128
Size:	222.8 KB
ID:	2204


Saltwater Mixing with Tunze NanoStream 6025 & Brightwell Aquatics Neomarine Reef Aquaria Salt
Friday, July 16, 2010

After some initial research among the various salt mixes available I decided to go out and purchase some Brightwell Aquatics Neomarine Reef Aquaria Salt from a local retailer "Gotham Aquatics" who was having a sale on it. After a very long drive sitting in rush hour traffic to Brooklyn and back to the Bronx I finally got home with my salt. From the claims and reviews regarding this salt it seemed to be the correct choice with you get what you pay for ringing over and over in the background. I now needed a method to mix the salt accordingly without having to resort to the All Clad Stainles Steel Cooking Spoon from Williams Sonoma that is hanging in the kitchen. So I purchased a 5 gallon painters bucket from Home Depot and placed on order for a Tunze NanoStream 6025 Pump with new generation Titanium Allow Shaft rated at 660 gallon per hour at 6 watts of energy to be used inside the bucket to stir the purified water and salt mixture so that my wife doesn't murder me for touching her toys in the kitchen.


Click image for larger version

Name:	TunzeNanoStream6025Photograph0003.jpg
Views:	99
Size:	240.9 KB
ID:	2334Click image for larger version

Name:	TunzeNanoStream6025Photograph0004.jpg
Views:	101
Size:	215.6 KB
ID:	2335Click image for larger version

Name:	TunzeNanoStream6025Photograph0005.jpg
Views:	111
Size:	257.1 KB
ID:	2336Click image for larger version

Name:	TunzeNanoStream6025Photograph0006.jpg
Views:	124
Size:	250.2 KB
ID:	2337Click image for larger version

Name:	TunzeNanoStream6025Photograph0007.jpg
Views:	111
Size:	227.9 KB
ID:	2338Click image for larger version

Name:	TunzeNanoStream6025Photograph0008.jpg
Views:	103
Size:	181.1 KB
ID:	2339
Click image for larger version

Name:	TunzeNanoStream6025Photograph0010.jpg
Views:	118
Size:	197.6 KB
ID:	2340Click image for larger version

Name:	TunzeNanoStream6025Photograph0011.jpg
Views:	111
Size:	210.3 KB
ID:	2341Click image for larger version

Name:	TunzeNanoStream6025Photograph0012.jpg
Views:	114
Size:	198.2 KB
ID:	2342Click image for larger version

Name:	TunzeNanoStream6025Photograph0013.jpg
Views:	111
Size:	176.2 KB
ID:	2343Click image for larger version

Name:	TunzeNanoStream6025Photograph0014.jpg
Views:	119
Size:	198.8 KB
ID:	2344
Click image for larger version

Name:	BrightwellAquaticsNeomarineSaltMixP.jpg
Views:	106
Size:	223.1 KB
ID:	2347Click image for larger version

Name:	BrightwellAquaticsNeomarineSaltM-4.jpg
Views:	150
Size:	174.9 KB
ID:	2348

Continue to part two of my thread: http://www.reefaddicts.com/entry.php...venture-Part-2

Submit "King Neptunes' 120 Gallon Sumpless Adventure." to Digg Submit "King Neptunes' 120 Gallon Sumpless Adventure." to del.icio.us Submit "King Neptunes' 120 Gallon Sumpless Adventure." to StumbleUpon Submit "King Neptunes' 120 Gallon Sumpless Adventure." to Google

Updated 10-05-2010 at 11:24 AM by KingNeptunesBounty

Categories
Tank Entry , ‎ Tank - Full Summary

Comments

  1. melev's Avatar
    Yes it can be done without a sump, but if you can put one in the stand, you won't regret it.

    Sometimes being a non-conformist is a good thing, but sometimes it just makes it harder on yourself. For example, I hate tollways and having to pay to use them, but as a friend of mine pointed out "so you'll drive out of your way, spend more money on gas, waste more of your time just so you don't have to pay a toll?" She was right - and I hated to admit it. Now I have a toll tag and use it from time to time. Btw, did you know that cash paying drivers pay more than those that have a tag?! How unfair is that method? Don't get me started...

    If you have the room for Hang-On-Back (HOB) equipment and maintain good water quality, go for it. I highly recommend some type of background for your aquarium so you don't see all that gear and wires. Those are ugly distractions. Alternately, as was pointed out above, you can drill the tank yourself and run plumbing down to a sump instead - assuming the tank isn't made with tempered glass.
  2. KingNeptunesBounty's Avatar
    Quote Originally Posted by Midnight
    Really the main limitation I see is that your choices of hang on the back skimmers is very limited for that size tank. I ran a 120 sumpless for a long time. It was a fish only live rock setup with a prizm skimmer and two emporer 400 hang on the back filters and I did not have problems at all. good luck and keep us posted.
    Midnight, to be entirely honest I would not have even considered this is I didn't feel that their was at least a suitable Hang On Back Protein Skimmer available that would handle an aquarium as large as mine. I have been considering various Protein Skimmer and believe that I will be purchasing a Deltec MCE600 Hang On Back Protein Skimmer... maybe even two if there reputation lives up to my expectations.
  3. KingNeptunesBounty's Avatar
    Quote Originally Posted by marks69
    just by the bits and drill it yourself. i did 6 holes in the back of my tank in around 1 hour with no problems. alot of pucker factor but now i know what i'm doing and am not worried a bit.
    Quote Originally Posted by melev
    Yes it can be done without a sump, but if you can put one in the stand, you won't regret it.

    Sometimes being a non-conformist is a good thing, but sometimes it just makes it harder on yourself. For example, I hate tollways and having to pay to use them, but as a friend of mine pointed out "so you'll drive out of your way, spend more money on gas, waste more of your time just so you don't have to pay a toll?" She was right - and I hated to admit it. Now I have a toll tag and use it from time to time. Btw, did you know that cash paying drivers pay more than those that have a tag?! How unfair is that method? Don't get me started...

    If you have the room for Hang-On-Back (HOB) equipment and maintain good water quality, go for it. I highly recommend some type of background for your aquarium so you don't see all that gear and wires. Those are ugly distractions. Alternately, as was pointed out above, you can drill the tank yourself and run plumbing down to a sump instead - assuming the tank isn't made with tempered glass.
    Marks69 & Melev, unfortunately the aquarium itself is tempered on all the panes so drilling will not be an option. However, the bottom of the stand does have some other purposes that I have in mind that I will discuss later on.
  4. KingNeptunesBounty's Avatar
    Quote Originally Posted by marks69
    secret beer fridge?lol
    gl
    mark
    Marks69, that is a damn good idea... well at least to double as a beer fridge and I fish food storage unit. I can just see the possibilities.
  5. KingNeptunesBounty's Avatar
    Quote Originally Posted by marks69
    i'm always thinking of beer.lol
    unless there's room for a stripper pole.lol
    Marks69, unless their Dwarf Strippers or extremely talented then we may have to rethink the whole stripper pole underneath the aquarium.
  6. melev's Avatar
    Interesting stand accessory ideas...


    I like the rockwork you assembled. Be sure to stock VERY lightly at first because you aren't using any live rock as your natural filtration. It can take as long as 9 months before it will be beneficial and life supporting.
  7. melev's Avatar
    Per your PM, I removed those unnecessary attachment files. I also enlarged the rockwork images since they were the part you wouldn't want to miss. To make an image larger that you've attached, move your mouse over the image, then click on the little pencil that appears. Select the size you want, then Okay. I set those to large.

    HTH.
  8. KingNeptunesBounty's Avatar
    Quote Originally Posted by melev
    Interesting stand accessory ideas...


    I like the rockwork you assembled. Be sure to stock VERY lightly at first because you aren't using any live rock as your natural filtration. It can take as long as 9 months before it will be beneficial and life supporting.
    Quote Originally Posted by melev
    Per your PM, I removed those unnecessary attachment files. I also enlarged the rockwork images since they were the part you wouldn't want to miss. To make an image larger that you've attached, move your mouse over the image, then click on the little pencil that appears. Select the size you want, then Okay. I set those to large.

    HTH.
    Melev, thank you for taking care of the photographs. I wasn't exactly sure how to do that myself but learned shortly after tinkering with various double clicking around the screen. As far as the live rock is concerned I will definitely be letting the cycle take it's full couse. I have a very small monthly budget set aside for reef related purchases and it is going to take me some time before I will even get the fish inside the water (hoping before the end of the year but realistically it may be longer then that). I am not complaining about that one bit. It keeps my thoughts on the build process and provides me with ample time to make informed decisions, which I am sure will pay off in the long run.
  9. KingNeptunesBounty's Avatar
    Quote Originally Posted by Midnight
    Under the stand strippers sounds very promising. Maybe we should rethink the height of the stand to accommodate the pole. Not sure how the bathroom wall is less obtrusive than under the sink but hey I am always missing something.
    Midnight, although the couch is next to the aquarium I doubt I want to sleep on it every night even with the potential entertainment. Our Half Bathroom is located in the master bedroom which is the only room only my wife and I enter. Therefore I can make my water in peace without friends and family coming over on the weekend and seeing buckets from me doing what my wife calls my "Jesus Thing... Making Water".
  10. melev's Avatar
    me doing what my wife calls my "Jesus Thing... Making Water".
  11. KingNeptunesBounty's Avatar
    Quote Originally Posted by melev
    When you add up all the parts, what did this RO/DI system cost you total?
    Melev, were looking at $293.67 in total for purchasing all the equipment separately. $112.75 for the Aquatec 8800 Booster Pump, Transformer which includesshipping charges + $28.94 for the Hannah Dual TDS Meter which includes shipping charges + $132.00 for the Water General 6-Stage RO/DI Unit which includes shipping charges + $8.99 for the Faucet Diverter Valve which includesshipping charges + $10.99 for the Faucet Adapter which includes shipping charges.
  12. KingNeptunesBounty's Avatar
    Quote Originally Posted by NightShade
    Nice looking setup. I hope to have a ro/di unit of my own some day soon. My only problem is finding exactly what I want. I personally hate having waste water, and have seen some units that have a booster pump that pushes the waste into the hot water lines so that it just doesn't run down the drain for no reason.

    Anyway. . . do you have any pics of the faucet diverter valve and adapter hooked up. I don't know what the best way to set things up will be when I do get a system and still trying to get it all figured out.
    Nightshade, thank you for the compliments. I currently do not have the Diverter Valve installed in this setup because I am still waiting on an the delivery of the Faucet Adapter to link my female 15/16 Faucet to the Female 55/64 Diverter Valve. Once this piece is delivered I can go ahead and post photographs. Personally if you don't want to waste the water you can have it drain into a separate container or some units even have it go into a secondary Reverse Osmosis unit for further purification.
  13. KingNeptunesBounty's Avatar
    Quote Originally Posted by marks69
    couldn't you have just put another shut off under the sink and t'd off of it? my kids would trip over that so quick.lol
    Marks69, I definitely would have removed it if I own the house myself but I am renting the house so that is why I went the route that I did. It this were my house the setup would be completely different and I would have replaced the plumbing with compression fittings accordingly. But my unit it as least set 5 feet high so I don't think anyone will be tripping anytime soon, especially since it in the bathroom in the Master Bedroom.
  14. KingNeptunesBounty's Avatar
    Quote Originally Posted by melev
    That'll work!
    Melev, just learning from you!
  15. KingNeptunesBounty's Avatar
    Quote Originally Posted by Midnight
    Luckily mine is set up above a wash basin in the pool room off the garage that is conveniently located with in 10 feet of the tank.
    Midnight, do I get kudos for having mind on the same floor as the tank? :-)
  16. KingNeptunesBounty's Avatar
    Quote Originally Posted by Alaska_Phil
    That should do the trick, in fact the tunze is overkill. I use a little Minijet 404 rated for about 60gph to mix 10 gals at a time in a Brute garbage can. That tunze is going to create a whirlpool. I also drop a spare heater in there since my mixing room can get down to 60 degrees in winter.
    Alaska_Phil, it definitely will do that job for mixing the salt and I do plan on including a heater as well as an airstone to aerate the water for 24 hours before placing it into the aquarium for scheduled water changes.
  17. KingNeptunesBounty's Avatar
    Quote Originally Posted by JABlacher
    Yeah, I agree that the Tunze is a bit overkill for mixing salt when a $30 Koralia would do the same but thats your choice. Just toss a heater in there if need be to get the water within the temperature of your tank before doing water changes.
    Ablacher, I like the Tunze overall design and they use less energy than the Koralia so I dished out the extra money for that feature. Twice the price but whatever I can do to stay one step ahead of Consolidated Edison.
  18. KingNeptunesBounty's Avatar
    Quote Originally Posted by Alaska_Phil
    The air stone and heater alone would be enough, you just need to keep the water moving and not stagnant. You don't need to simulate a reef crest in your mixing bucket.
    Alaska_Phil, I choose not to go with the minimum because I want a way to also ensure that all the salt has dissolved accordingly in a short period of time. It would take too long using just an airstone for circulation.
  19. KingNeptunesBounty's Avatar
    Quote Originally Posted by MarcG
    I use a Maxijet 1200 with a sure flow mod (2100gph) that I had laying around and I KNOW it is way too much, but I also do about a 30 gallon change every two weeks. It mixes the water a bit quicker, it was cheap when I bought it and I already had it. Plus it won't leak electricity like a Koralia....
    MarcG, definitely agree that faster in this case is better for me as well.
  20. Midnight's Avatar
    who's koralia is leaking electricity?