OneReef
Creating a ShadowBox Background

by
, 10-07-2011 at 07:15 PM (5293 Views)
I recently purchased a custom Marineland (Perfecto) 120g. This time, I decided to deviate from my norm, the painted black background, and try an interesting concept that I have seen posted in various reef forums. The purpose of the shadowbox is to have it back-lit behind the tank, and painted to give the illusion of depth in your tank, as in looking through the tank into the ocean. I've read threads on peoples different shadowbox creations, and took some info from different ones I saw, and created my own version of what I thought would be easy to make, and give me the look that I was going for.
My basic parts that I began with:
2'x4' frosted clear acrylic sheet
2'x4' transparent light blue acrylic sheet
One twelve foot 2"x1" strip of wood for the frame
4 'L' brackets
Light sky blue spray paint
Dark Blue spray paint
Gray spray paint
Two 12" Ecoxotic Stunner strips (8000K white)
fine steel wool
Here is the beginning of it, and I'll post pictures as I go along each step, and then I'll post pictures of the final result.
I made the frame a 2'x4' rectangle to match the size of the back of the tank. After the frame was built (corners secured with 'L' brackets), I added on the back sheet of acrylic which was frosted clear.
I then used fine steel wool to buff the blue acrylic to give it a frost or hazy appearance, since it was so transparent.
I then attached the blue acrylic sheet to the frame to check for fit.
In the meanwhile, I taped together two pieces of poster-board, just to do a test painting to get an idea of what I was doing, and how I wanted it to turn out. This photo is of the posters in a trial painting test run. Then I could tape it inside the frame just to see how it looked behind the frosted blue, to see if it had the look I was going for before I painted the actual back acrylic sheet.
I then taped it inside the frame to see what changes I needed to make to the transparancy of the blue acrylic, as well and the coloring of the paint. Below is my first trial run with the test poster.
I then added the two 12" Ecoxotic Stunner strip in 8000K to the top inside of the frame, which will shine light down between the two front and back acrylic sheets.
I took the trial poster board painting out, and spray painted onto the actual back acrylic sheet. I drew in a couple of small plants, gorgonian like, just to give it a little character. I also ended up taking the 'L' brackets that were on the inside of the frame, and changed to to be on the outside of the frame, so that you could not see them through the tank. (Did that after this photo was taken)
I attached a couple of brackets on the back of the stand for the frame to sit on.
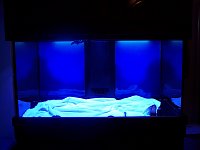
Here is the ShadowBox attached to the back of the tank. It is just held in place by sitting on the brackets, and a couple of pieces of duct tape at the top to hold it against the back. I did this so I could easily remove the ShadowBox in the future for lighting repair, background color changes, or anything that I might wish to modify in the future. I can simply lift it over the top of the tank to get it out if I need to.
Here is kind of what it looks like. I have made a couple of changes since, and this doesn't show how good it actually looks due to me forgetting to adjust the white balance on my camera and getting too much blue in the picture. I will try to get a better picture of it on here so that you can see how it really looks in action. In reality, it is much more light sky blue and looks like the ocean. It is not royal blue like this picture came out.